As I read about restaurants in the United States and elsewhere closing their doors to help stop the spread of coronavirus, I started thinking about people (like some members of my family) who eat out for every meal and for whom using the toaster or pushing buttons on the microwave is the extent of their cooking ability. And while I know there are usually plenty of frozen meals and pre-made options available at the grocery store, I also know that those can get old quickly, and some are sold out. So I wanted to provide a few basic recipes that can be made with mainly items that keep for a long time in the pantry/fridge/freezer, to help everyone stay home without going on a two-month diet of peanut butter toast and Spaghetti-Os.
By the way, I know there are plenty of you who do know how to cook and just choose not to. This post may be helpful for you, too, but I am going to get pretty basic with the instructions, because I remember a time when my grandmother bought me a box of Kraft macaroni and cheese and then asked if I knew how to make it, because she couldn’t remember.
Please note: These recipes are not gourmet in any way, shape or form. But they are easy and don’t require a ton of ingredients or much equipment, which is important if you’re quarantined in your house for weeks. I am going to assume that everyone knows how to turn on their stove and oven, but if you’re not sure, please email me (at jen@marshmallowsandmargaritas.com) a picture of the control panel and I will help you.
Also: I didn’t put any salt or pepper in most of these recipes, but please feel free to add some if you’d like. Except to the smoothie. Please don’t put salt or pepper in your smoothie.
Breakfast
Scrambled eggs
You will need: Eggs, butter or cooking spray (like Pam), a pan or skillet, a small bowl (a cup or glass works, too), a whisk or rubber spatula. Optional: Grated cheese
How to make it: Put the skillet on one of the burners on the stove and put a little bit (about a half tablespoon, but it doesn’t have to be exact) of butter in the skillet, or just spray the skillet with cooking spray. Turn the burner on low if you have a gas stove (you will be able to see a flame) or medium if you have an electric stove. Let it heat up while you get the eggs ready.
Crack the eggs into a small bowl or other container, being careful not to get any shell in there (if you’re not sure how to crack an egg, Google it!). Two or three eggs per person is a good rule of thumb. Use a whisk or a fork to break up the yolk and stir up the eggs until the liquid looks like it’s basically all one color.
Pour the eggs into the hot skillet, and add some grated cheese if you have some (I use about a handful of cheese per two eggs, but you can use as much or as little as you would like). Let it cook for 30-45 seconds, then use the whisk or a rubber spatula to stir everything around. Let it cook for another 30-45 seconds, and whisk/stir again. keep doing this until the eggs look cooked, then turn off the heat, put the eggs on a plate, and eat.
Breakfast tacos for two
You will need: Scrambled eggs (see above), grated cheese, tortillas, salsa. Optional: Half a package of bacon, a small can of chopped green chiles, a can of refried beans, half a bag of frozen hashbrowns (the shredded kind).
How to make them: If using hashbrowns, cook those first (use the directions on the package). Once they’re cooking, start cooking the bacon (directions should also be on the package). You can make the whole package of hashbrowns and/or bacon if you’d like, and save the extra for later.
Once those two things are done or almost done (depending on how much room you have), make scrambled eggs using 5-6 eggs. Put some cheese and half the can of chopped green chiles in the eggs when you’re cooking them.
If using beans, spoon about half the can into a microwave-safe bowl, then stir in the other half can of chopped green chiles and some cheese. Microwave until warm (I would start with a minute and then add more time as needed).
Once all of the elements you’re using are ready, assemble the tacos by placing some refried beans, scrambled eggs, cheese, bacon (I break mine up into small pieces so it fits into the taco more easily), hashbrowns, and salsa into tortillas. Microwave for 30 seconds if you want the cheese to be a little melty.
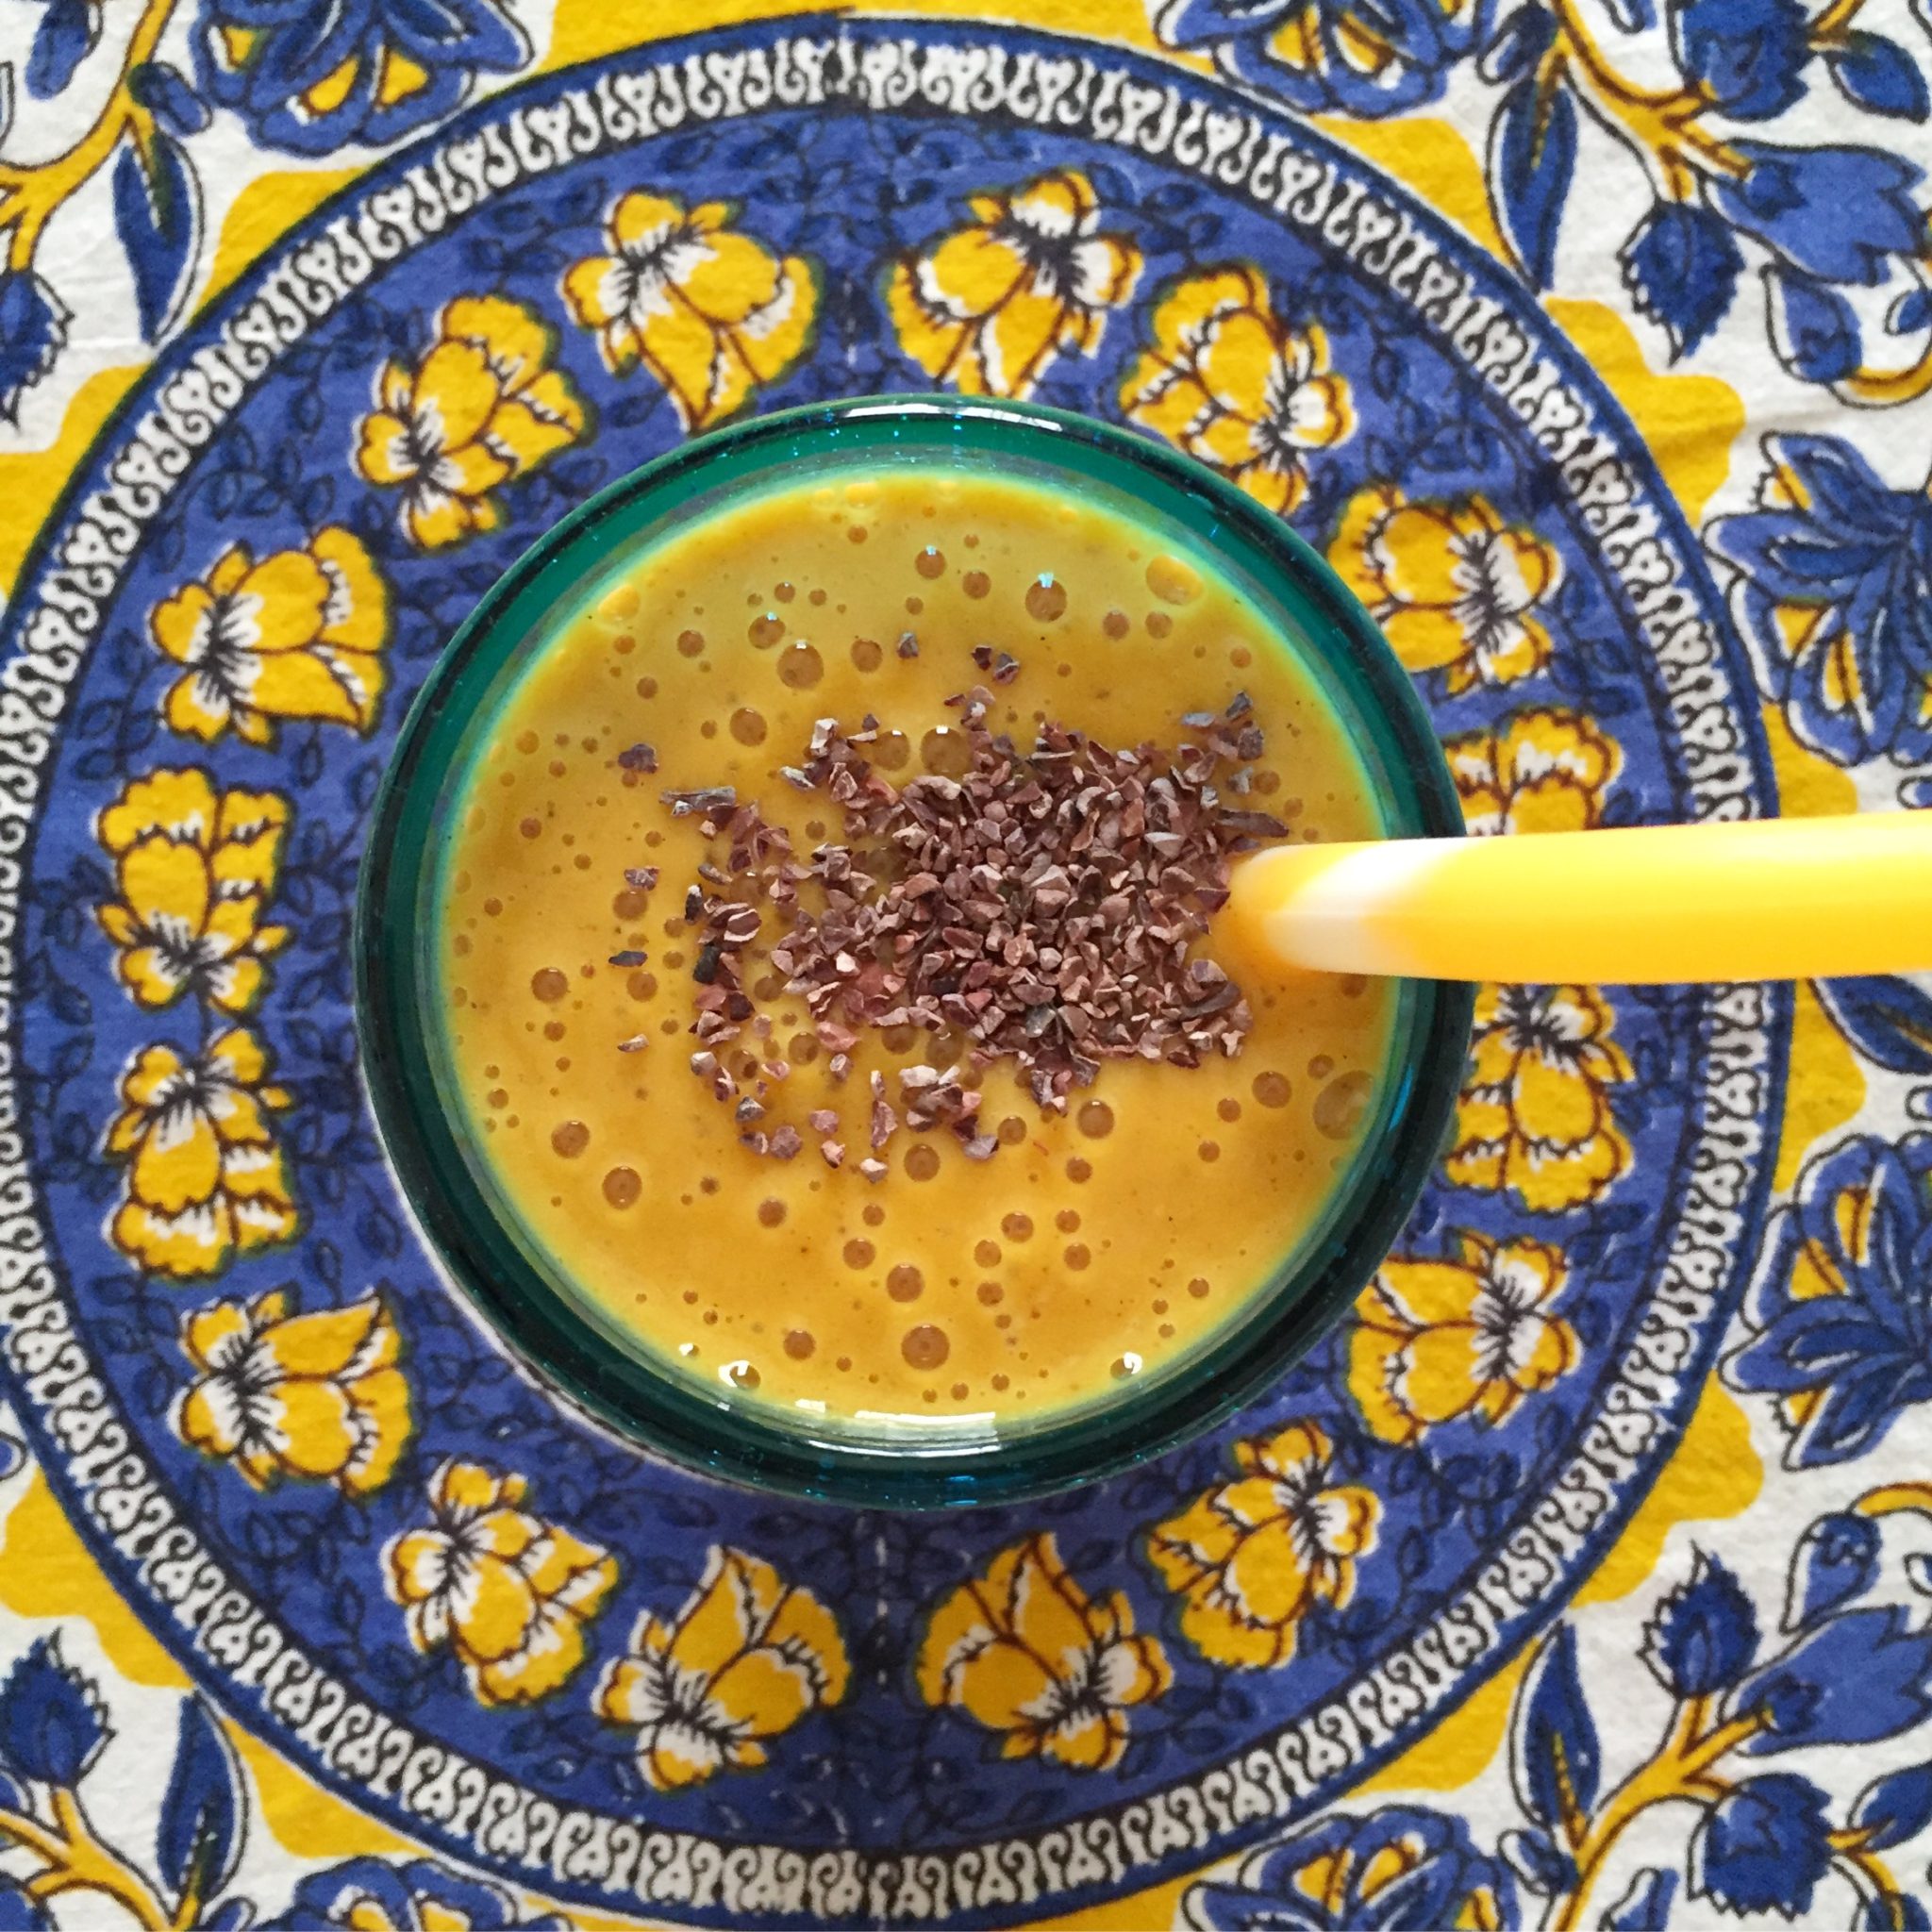
Smoothie
You will need: Frozen fruit (all one kind, or a blend of different kinds — just make sure they go together, like strawberries and blueberries, or mango and pineapple), some kind of milk (cow’s milk, almond milk, coconut milk… whatever) or juice, a blender. Optional: Fresh fruit (a banana or a date is good for added sweetness), yogurt/cottage cheese, protein powder, honey/maple syrup
How to make it: Place about three cups of frozen fruit and one cup of milk/juice in a blender or food processor. Add 1/2 cup yogurt or cottage cheese, some fresh fruit, and/or a scoop of protein powder. Put the lid on and blend. If the smoothie won’t blend, add more liquid.
Taste the smoothie before you pour it into your cup. If it’s not sweet enough, add a little honey or maple syrup and blend again.
Main dishes
Quesadilla
You will need: Two flour tortillas (to make one quesadilla), shredded cheese, about 1/2 tablespoon of butter, a skillet or pan, and a spatula. Optional: Shredded chicken (see the slow cooker section below for a recipe), small can of diced green chiles, refried beans, salsa, guacamole, etc.
How to make it: Get the tortillas, cheese, and anything else you want to put inside the tortilla out of the fridge and set them on the counter next to the stove. Put the skillet on one of the burners on the stove, and put 1/4 tablespoon-ish of butter into the skillet. Turn the heat on low-medium and let the butter melt.
As soon as the butter has melted, put one tortilla down flat on the skillet, then immediately top with grated cheese. Make sure you put enough cheese in there that it goes all the way to the edges. If you are adding other toppings, add those now, then top with more cheese. Place the second tortilla on top of the toppings, aiming to line it up with the bottom tortilla.
Press down on the top tortilla with the spatula for 30 seconds or so, then just let the whole thing sit there on the heat for another minute or two–until the cheese has started to melt. Smoosh it down one more time with the spatula, then carefully flip it over. Once you flip it over, put the other 1/4 tablespoon of butter in the skillet (just sort of put it on the side, not really on the quesadilla itself, then use the spatula to lift up the quesadilla a bit so the butter goes under it.
Let the quesadilla cook another minute or two, then use the spatula to try to lift up the edge of the top tortilla to check if the cheese is melted. If it is, you’re done! If not, wait another minute and then check again. If you flip it and it isn’t golden brown on each side, you can let it cook for a little longer and flip it again.
Cut into wedges (like a pizza) and serve as-is, or with salsa, guacamole, and/or refried beans.
Spaghetti with meat sauce
You will need: 1 box spaghetti, 1 pound ground beef, 1 jar of pasta sauce (I like to get the really big jar of Ragu, but you can get any brand/kind you like, and the medium-sized jar is fine), salt, at least one large pot (two large or one large and one medium is ideal), a big spoon (wooden is preferable), and a colander/strainer (although one of those claw-looking pasta spoons with a hole in the scoop part will work in a pinch). Optional: One clove of garlic, olive oil, parmesan cheese.
How to make it: Put the pot (the larger one, if you have two of different sizes) on a burner on the stove. If you have some garlic and know how to smash and mince it, or if you have a jar of already minced garlic, put a clove’s worth in the pot, along with about a tablespoon of olive oil. Turn the burner on medium heat and allow to cook for 30 seconds to a minute, while you’re opening the package of ground beef. As soon as it starts smelling garlicky (or to start the process, if you aren’t using garlic), dump the ground beef into the pot. Let it cook for at least a minute, then use the wooden spoon to start to break up the meat and turn it over to the other side. Continue cooking, turning, and breaking up the meat until most of it is brown. Then dump in the whole jar of pasta sauce and stir to combine the meat with the sauce. Let the mixture cook until it starts bubbling, then (carefully!) stir it again, and turn the heat down to low.
If you only have one pot: Set a timer for 25 minutes and just let the sauce cook on low, stirring it every 5-10 minutes. When the timer goes off, turn off the burner. Stir the sauce again, let it cool down for a minute or so, and then (carefully!!) pour it into a big, heatproof bowl. Rinse out the pot, then fill it about halfway with water and put it back on the stove, and turn the burner to high.
If you have two pots: Set the timer for 15 minutes and let the sauce cook on low, stirring it two or three times during that 15-minute period. When the timer goes off, get the other pot and fill it about halfway with water. Put the stove on an unused burner (the sauce will still be cooking), and turn the burner with the new pot to high.
Either way: Once the water starts boiling (lots of bubbles on the surface, not just tiny bubbles around the edges), add a few shakes of salt to the pot, then add in as much dry spaghetti as you want to make (servings are hard to estimate, but if you look on the package it should say how many servings are inside. These servings are typically a little small, though, so you may want to make a little more than what you think you need.) You may need to have some of the spaghetti sticking out of the water initially, but you should be able to push it down with the spoon after 30 seconds or so. Set the timer for 8 minutes (or 11 minutes, if you like softer pasta) and put the colander in the sink.
When the timer goes off, turn off the burner with the pasta pot on it. Use oven mits or towels to pick up the pot and carry it to the sink, then (carefully, pouring away from your body if at all possible) pour the water and pasta into the colander. If you don’t have a colander, then use a slotted pasta spoon to quickly remove all of the pasta from the hot water.
Put the pasta in individual bowls and spoon hot sauce on top. Sprinkle some parmesan cheese over the top (if you have it) and serve!
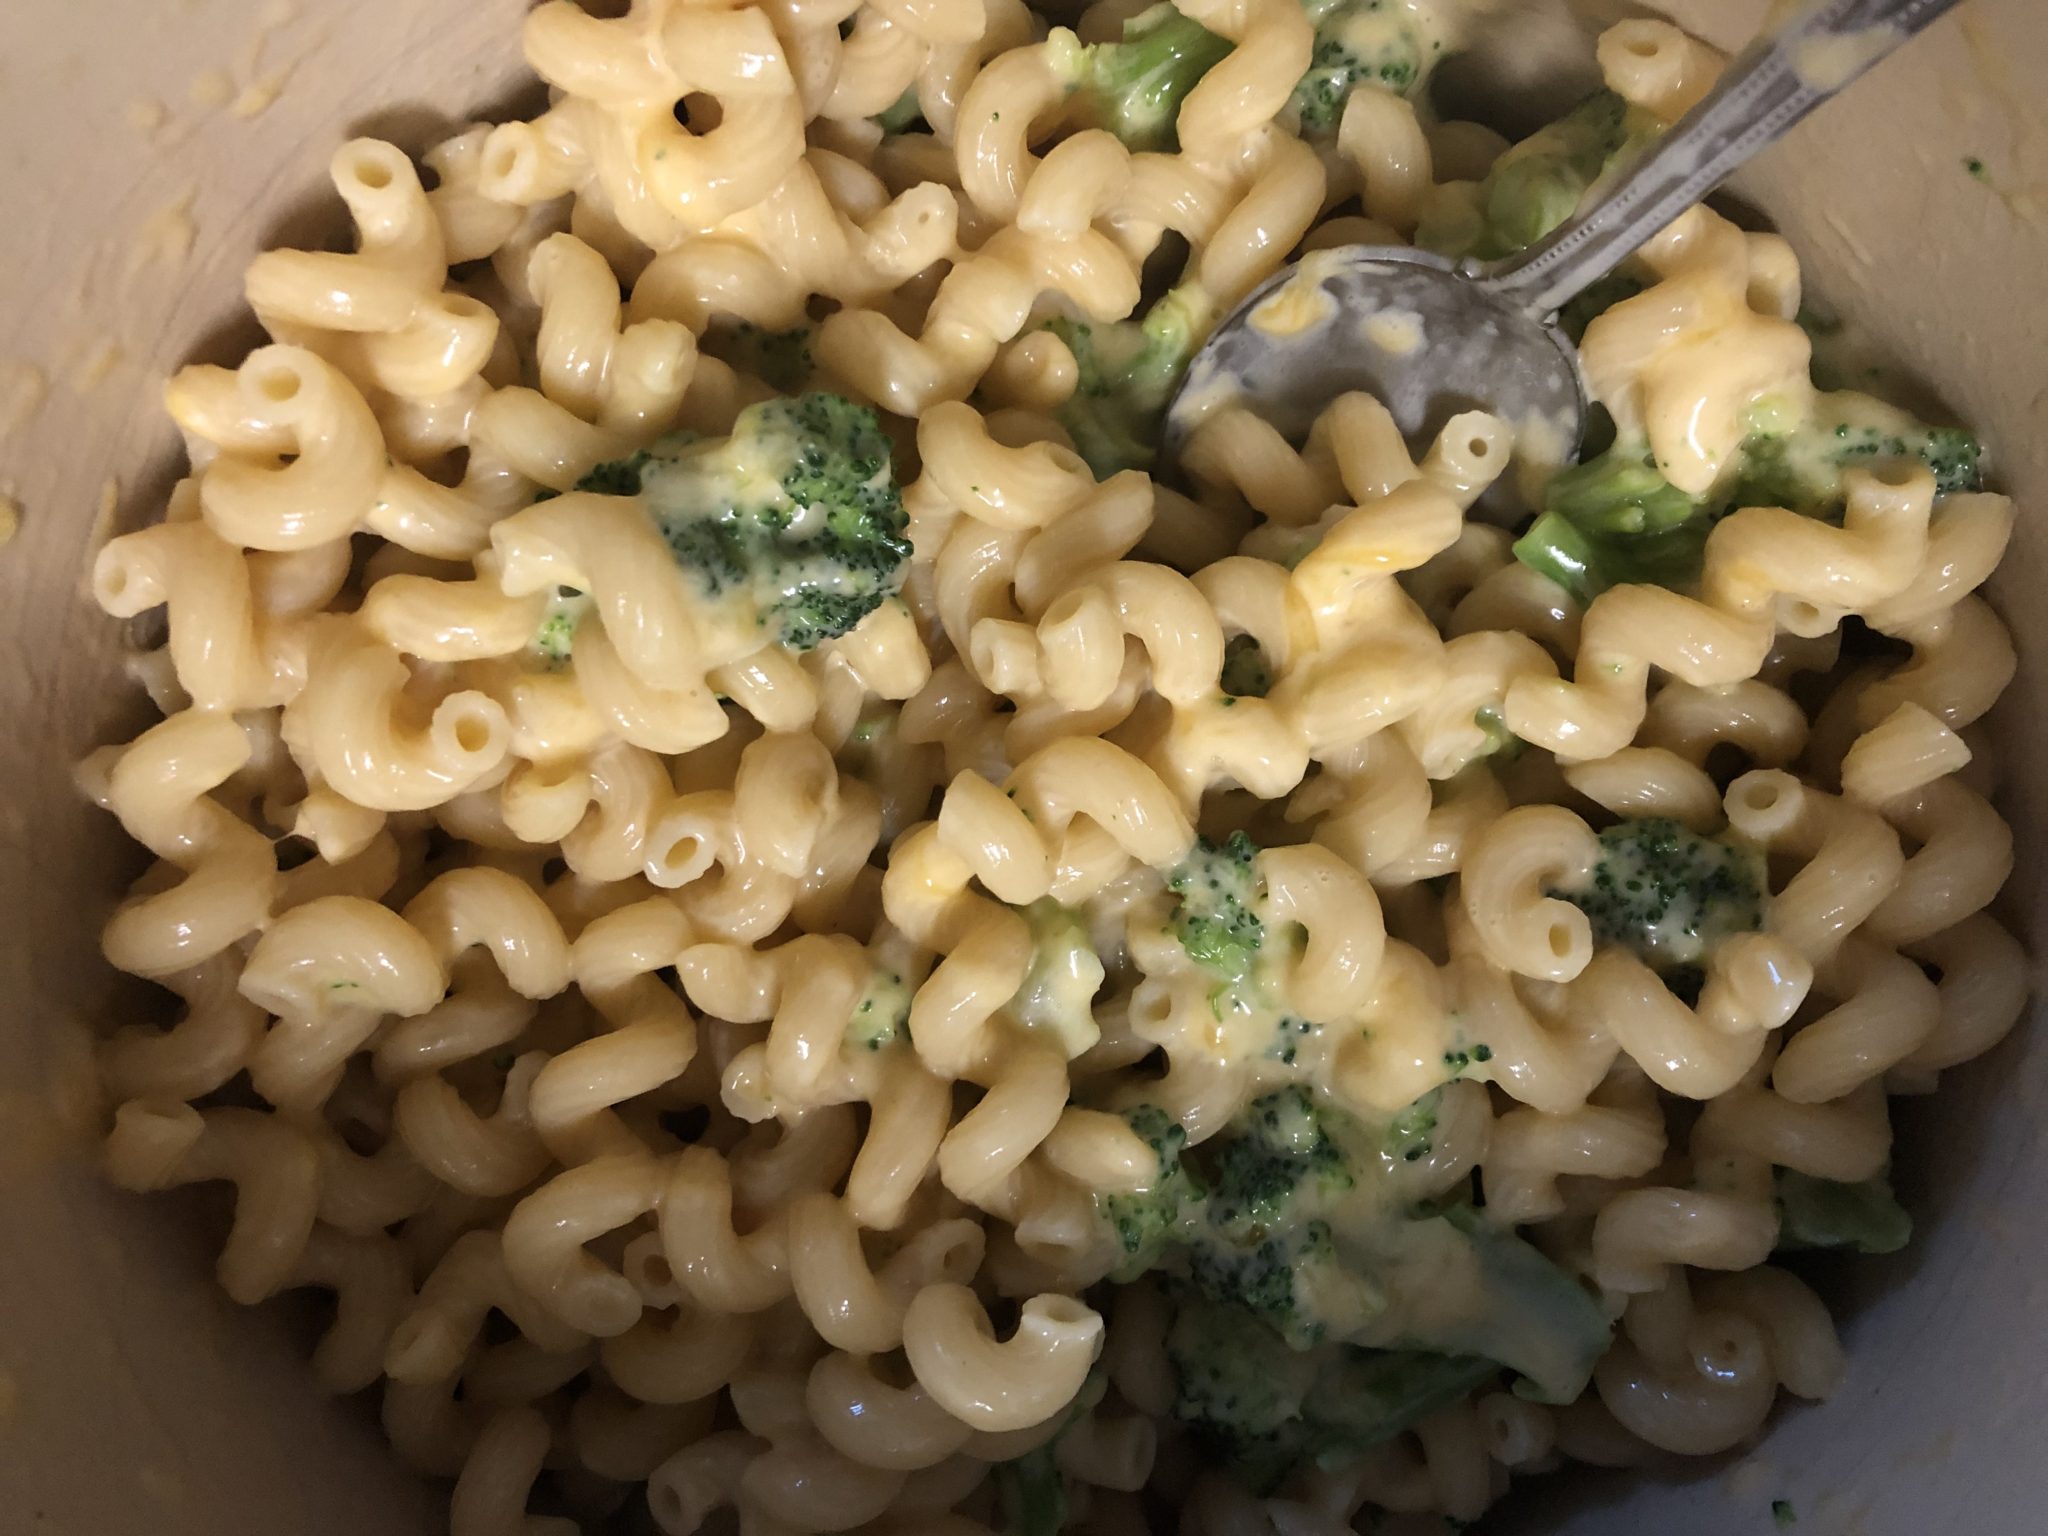
Macaroni and cheese (with or without broccoli)
You will need: 1 box (1 pound) elbow noodles or other mac & cheese-friendly pasta, 8 ounces sharp or extra sharp cheddar cheese (I recommend you buy a brick and then grate it yourself, but if you’re using pre-grated, you’ll need 2.5 cups), 5 to 6 ounces of Colby cheese, Gruyere, or mild cheddar (1.5 cups grated), 1/2 cup milk, 2 tablespoons butter, one large pot, a colander/strainer. Optional: One bag of steam-in-the-bag broccoli florets, or 1 large head of broccoli, cut into bite-sized pieces
How to make it: Fill the pot about halfway with water, put it on a burner on the stove, and turn the burner to high. Put the colander in the sink.
Once the water is boiling (you will see lots of bubbles, not just tiny ones around the edges), dump the whole box of pasta in. Check the pasta box, and then set the timer for 1 minute less than the box recommends for “al dente.” If using steam-in-a-bag broccoli, put it in the microwave and cook it according to the package directions. If you’re using fresh broccoli, put it into the water with the pasta two minutes before it’s supposed to be done.
Once the noodles are ready, use two pot holders to carefully pour the contents of the pot into the colander (pour the water away from your body so you don’t injure yourself if it splashes). Jiggle the colander around a little bit to get as much water out as possible, then put the noodles (and broccoli, if you were cooking it with the pasta) back into the pot. If using microwave broccoli, open the bag and dump that into the pot with the noodles now.
Put the pot back on the stove and turn the burner to low. Add the butter, cheese, and milk to the pasta, and stir the whole thing until the cheese melts. Serve immediately.
*When reheating this in the microwave, drizzle a little bit of milk over the top of it first, then stir it all up once it’s warm. The milk should help make it creamy again.
Slow cooker
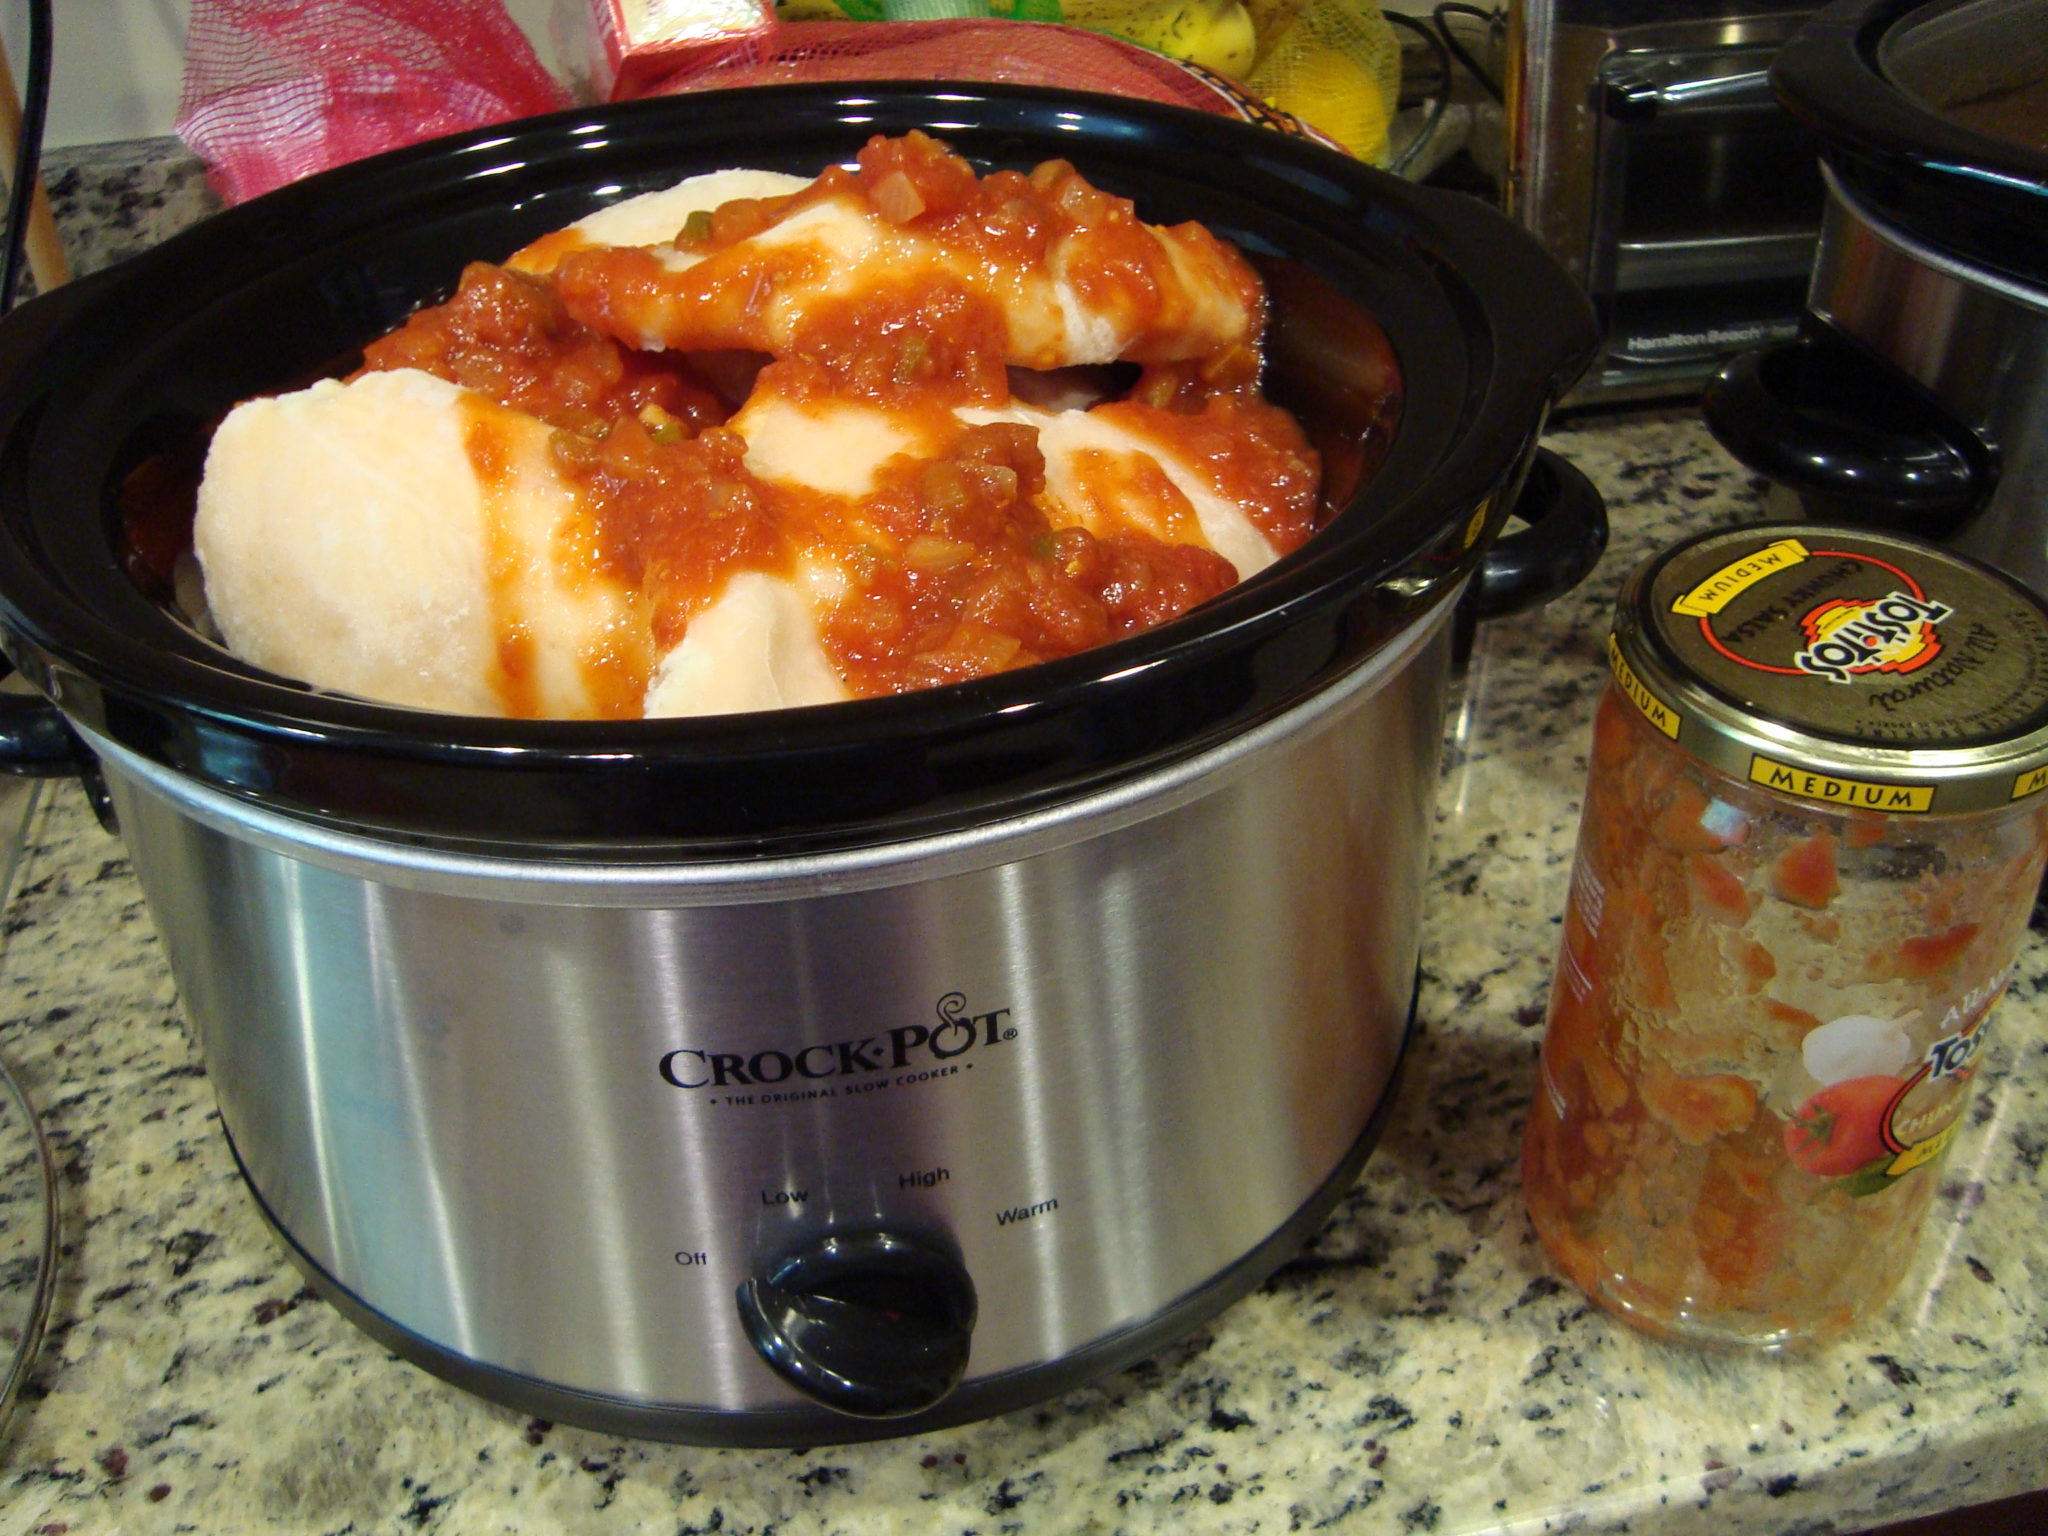
Salsa chicken
You will need: A bag of frozen raw boneless chicken breasts (they can be whole, thinly sliced, in tenderloins, or whatever, but make sure they say boneless!), a small jar of salsa, and a slow cooker (either a Crock Pot or something very similar).
How to make it: Pour a little bit of salsa into the bowl of the Crock Pot. Dump the entire package of chicken breasts into the bowl on top of that salsa. Pour the rest of the salsa on top. Put the lid on the Crock Pot and turn it on low. Cook it on low for 8 to 10 hours, without lifting the lid. Once it has been at least 8 hours, remove the lid and use two forks to shred the chicken (it should shred really easily, so if it doesn’t, put the lid back on and cook it for another hour or so).
You can just eat the chicken as-is, put it in a tortilla with some cheese and more salsa to make a soft taco, put it on chips with some cheese and refried beans (then microwave that for a minute or so) to make nachos, or use it however else you’d like.
Hawaiian chicken
You will need: A package of frozen boneless chicken breasts (doesn’t matter if they are whole, split, tenderloins, etc, but make sure they are boneless!), a bottle of barbecue sauce (any kind), a small (8 ounce) can of crushed pineapple, and a slow cooker (either a Crock Pot or something very similar).
How to make it: Dump the whole bag of chicken breasts into the bowl of the Crock Pot. Pour most of the barbecue sauce (like 75% ish) and all of the crushed pineapple on top of the chicken and stir a little. Put the lid on the Crock Pot and turn it on low. Cook for 8 to 10 hours without lifting the lid. The chicken will probably shred when you remove it from the Crock Pot.
Serve as-is with the leftover barbecue sauce, or on King’s Hawaiian buns as sliders. Microwave a bag of frozen broccoli florets as a side dish.
Pulled pork
You will need: Pork butt (this is sometimes called Boston butt. If you can’t find any, pork shoulder also works. Just be aware that these are generally pretty big, so try to make sure the one you get will actually fit in your slow cooker), sea salt, a slow cooker. Optional: Liquid smoke (this comes in a little bottle and is available near the spices in the grocery store)
Note: If your pork butt is in the 6-7 pound range, use about 1.5 tablespoons of sea salt and 1 tablespoon of liquid smoke. If the pork butt is more in the 10-12 pound range, use around 2.5 tablespoons of sea salt and 2 tablespoons of liquid smoke. You can use a normal spoon from your silverware drawer to measure this if you don’t have a measuring spoon — it does not have to be exact.
How to make it: Take the pork butt out of the package and rub the sea salt all over it. Put it in the bowl of the Crock Pot. Measure and pour the liquid smoke in (see note above for amount). Put the lid on the slow cooker and turn it on low. Cook on low for about 8 hours, then turn it over (use tongs or a fork – remember it will be hot!) and then put the lid back on and cook on low for another 8-10 hours. Use two forks to shred it. Serve with some barbecue sauce and hamburger buns or King’s Hawaiian rolls.
More easy slow-cooker ideas: Veggie chili, Buffalo chicken
Side dishes and snacks
Roasted vegetables
You will need: Two pounds of vegetables (just one kind, or a few kinds that go together), olive oil, a sharp knife, a cutting board, a large bowl, a cookie sheet with raised edges. Optional: Spices, garlic
How to make it: Preheat the oven to 425 F. Wash the vegetables. Even if they have a peel, you probably don’t need to peel them, but go ahead and peel them if you want to.
Cut the vegetables into roughly 1-inch pieces (this doesn’t have to be exact, but try to make sure all the pieces are roughly the same size as each other) and put the pieces in the bowl (also add two cloves worth of chopped or minced garlic, if you’re using it). Pour about two tablespoons of olive oil over the vegetable pieces and stir to sort of coat the vegetables in the oil. Pour the vegetable pieces onto the cookie sheet and spread them out so they are somewhat evenly spaced and not stacked on top of each other. If you’re using spices, sprinkle a little over all of the vegetables now.
Put the pan in the oven and set the timer for 15 minutes. Using a pot holder or heavy towel, take the pan out of the oven and use a spoon or tongs to stir/toss the vegetable pieces. Put the cookie sheet back int he oven and set the timer for 10 minutes. Check on the vegetables when the timer goes off. They should look crispy and the edges should be starting to brown. If they don’t look done, cook for another 5 to 10 minutes.
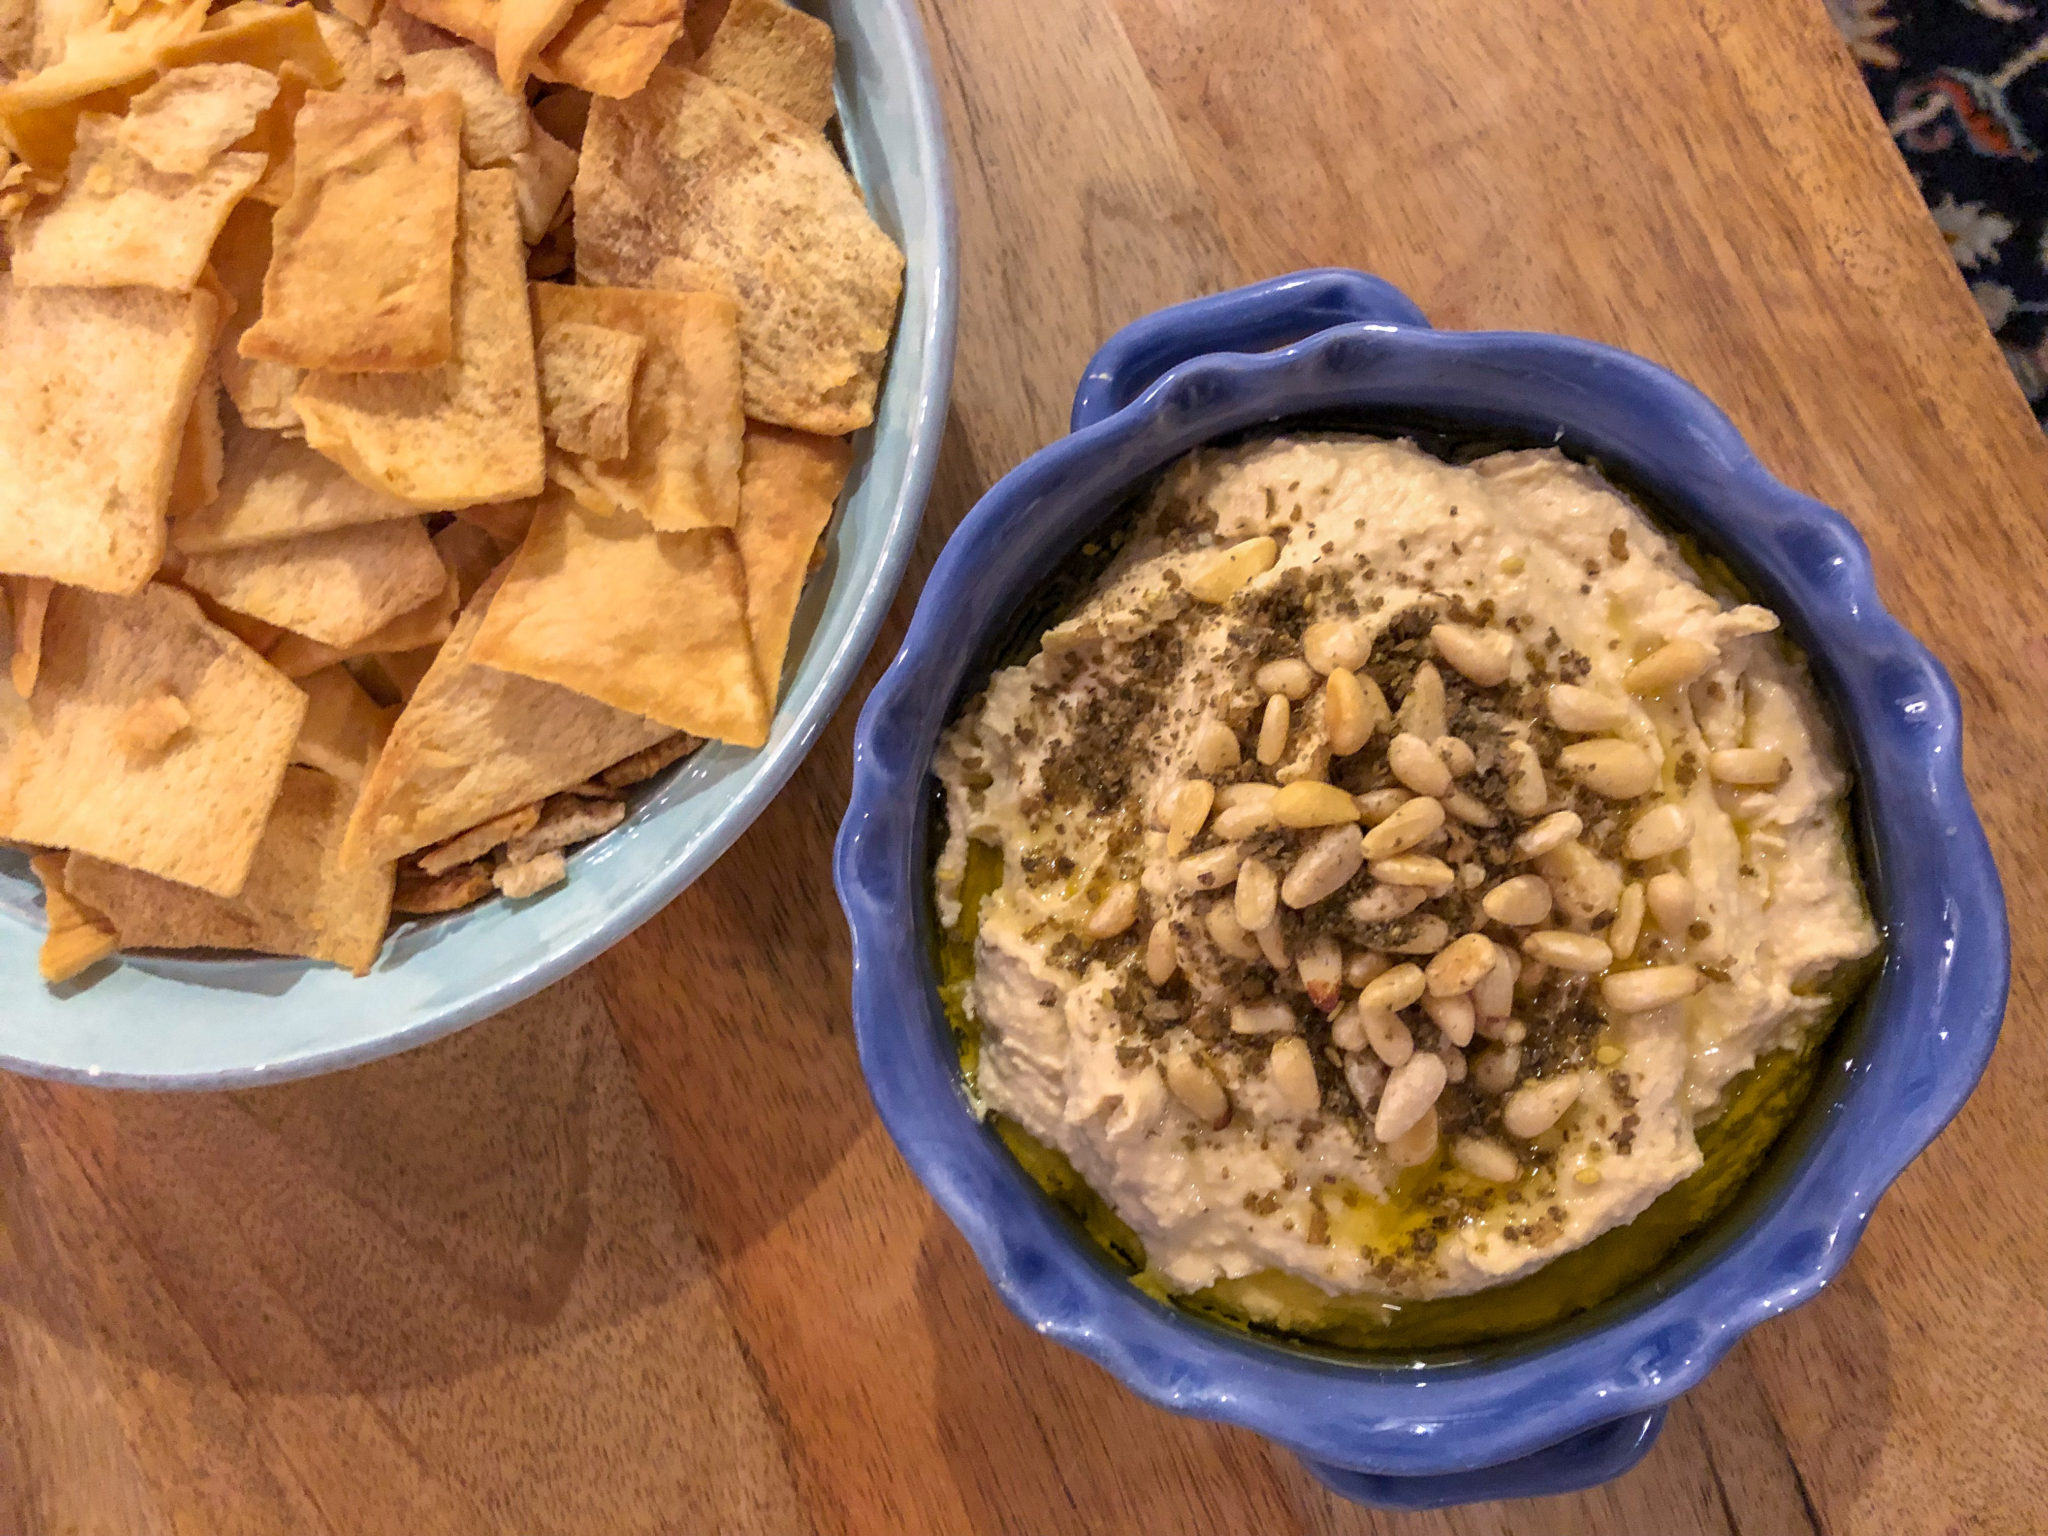
Hummus
You will need: 1 15-ounce can of chickpeas (sometimes called garbanzo beans), tahini (this will likely be in a jar in the exotic/foreign food section of the grocery store), 1 large lemon or 1/4 cup lemon juice, 1-2 cloves of garlic, extra virgin olive oil, water, a blender or food processor. Optional: Cumin (this is a spice you can get in the spice aisle), zatar (also in the spice aisle), toasted pine nuts
How to make it: Put at least 1/4 cup and up to 1/3 cup of tahini, 1/4 cup of lemon juice, 1 or 2 cloves of garlic, 2 tablespoons (you can use a regular spoon from your silverware drawer to measure if you don’t have measuring spoons) olive oil, and 2 tablespoons of cold water in the blender/food processor (you can also add 1/2 teaspoon of cumin, if you have it), and blend it for about a minute, until the mixture is well blended.
Open the can of chickpeas and carefully drain out all the liquid. Add the drained chickpeas to the blender/food processor and blend/process for at least two more minutes, until the mixture is really well mixed and looks creamy.
If using the hummus as a dip, put it into a bowl and drizzle a little more olive oil on top. Sprinkle some zatar and/or toasted pine nuts on top, if you have them. Enjoy!
Please let me know if this was helpful, and/or if there are any other recipes you’d like me to post. I know some things can be pretty hard to find in grocery stores, so if there is something you can’t find and need a recipe for, I want to help!